
Preparing Your Home for a Smooth Flooring Installation Day

Installing new floors transforms the entire atmosphere of your house, bringing fresh texture, updated style, and reliable durability to your living space. While choosing your new material is where the design vision takes shape, proper preparation ensures that vision comes to life without unnecessary delays or stress. Taking a few proactive steps before the crew arrives sets the foundation for a quick, efficient installation and protects both your home and your investment.
A smooth installation relies on clear communication, proper physical preparation, and a basic plan for managing your daily routine during the work. By following a structured approach to getting your space ready, you create an environment where installers can focus on precision craftsmanship from the moment they step through your door.
Clearing the Installation Zone

Installers need complete, unobstructed access to the room to prep the subfloor and lay material efficiently. Start by clearing out all loose items, decorative pieces, floor lamps, and small furniture. Hanging artwork, mirrors, and delicate wall decor should also be removed, as the vibrations caused by hammering, subfloor leveling, or heavy foot traffic can shift items off their hooks.
Larger furniture items like sofas, tables, and entertainment centers need to be moved to an unaffected room or stored in a garage. If you arranged for the installation crew to handle heavy furniture moving, ensure that all cabinets, dressers, and shelves are completely emptied beforehand to reduce weight and prevent damage to personal belongings.
Window treatments that hang down to the floor can easily gather dust or get caught underfoot while installers move large boards or rolls of carpet. Tie back floor-length curtains or temporarily take them down along with any low-hanging blinds. This keeps your fabrics clean from airborne debris and gives the installation team clear, safe access to the edges of every wall.
If the new flooring extends into walk-in closets, pantry areas, or under-stair storage spaces, these areas must be fully cleared. Remove everything off the floor as well as low-hanging clothes racks. Giving installers full visibility of the closet perimeter ensures clean cuts along baseboards and a continuous flow from the main room into smaller spaces.
Preparing the Subfloor and Trim Works
Depending on the type of flooring you selected, baseboards or shoe moldings may need to come off before the new material goes down. Hardwood, laminate and luxury vinyl plank require expansion gaps along the walls to accommodate natural room shifts, which are later covered by trim. If you plan to keep your existing baseboards, discuss with your installers whether they will carefully remove and reinstall them or if new shoe molding will be added to conceal the edges. Removing old trim yourself ahead of time can save installation hours, provided it is done carefully to avoid damaging the drywall.
While the installation crew will handle final surface leveling and underlayment placement, pulling up existing rugs or clutter allows you to inspect the subfloor early. Take note of any noticeable squeaks, dip areas, or moisture spots in advance. Pointing these out to your installer on the morning of the job helps them address structural prep work immediately rather than discovering issues mid-way through the project.
The work zone extends beyond the room getting new floors. Installers will travel back and forth between their work trucks and your rooms continuously, often carrying heavy materials or specialized cutting tools. Clear a wide, safe path from your driveway or entryway into the work area. Move entryway tables, shoes, coat racks, and outdoor planters to create an open walkway that minimizes structural contact during transport.
Managing Household Logistics and Comfort
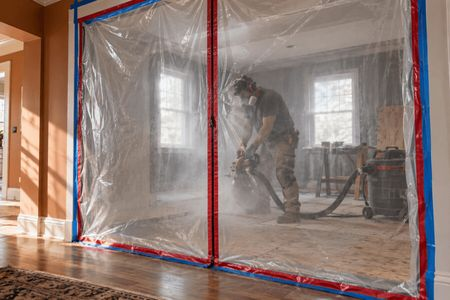
Flooring installation involves cutting, sanding, subfloor grinding, and constant foot traffic. Even with dust-containment systems, fine particles drift through the air. Protect adjacent rooms by sealing internal doorway thresholds with plastic sheeting or painter’s tape. Turn off your heating and cooling system during active demolition and cutting phases to prevent dust from being pulled into your ductwork and recirculated through the rest of the house.
An active project site involves open entry doors, sharp equipment, exposed nails, and power cords. The noise levels and unfamiliar faces can also create stress for household pets. Designate a quiet, closed room on a separate floor of the house, or arrange off-site care for pets and young children during installation hours. This guarantees their safety while keeping the workspace clear for the tradespeople to move freely.
Flooring materials—especially solid hardwood, engineered wood, and high-end vinyl—require a climate-controlled environment to settle properly. Your home’s temperature and humidity levels should remain at normal living conditions for several days before, during, and after installation. Additionally, installers need access to functional electrical outlets, suitable lighting, and access to a water source for mixing compounds or cleaning tools.
Coordinating with Your Installation Crew

When the lead installer arrives, walk through the work areas together to confirm the scope of the project. Review layout details, such as the direction the planks will run, transition points between rooms, and how threshold strips will sit against adjacent flooring. Taking ten minutes to verify these details in person prevents misunderstandings and confirms that the execution aligns with your visual design goals.
Installers require a dedicated, well-ventilated space to set up chop saws, tile cutters, and material stacks. A covered patio, garage, or dry driveway area works best. Ensure this space is clear of parked cars, outdoor furniture, or lawn equipment so materials remain clean, dry, and easily accessible throughout the day.
Once the floor is laid and the trim is replaced, walk the completed space alongside your lead installer. Check seam placements, perimeter trim fit, doors for proper swing clearance, and ensure all trash or old materials have been loaded for disposal. Asking questions during this final inspection gives you total peace of mind before the project is officially marked complete.
Finalizing Your Project Details
Preparing your home with a clear plan ensures installation day runs efficiently, protecting your property and allowing your new floors to be fitted with exact accuracy. Proper space clearance, open access paths, and thoughtful household management turn what could be a disruptive day into a rewarding step in your home renovation project.
At Right Carpet & Interiors, we’ll help you explore your options and find the right flooring for your home in Alamosa & South Fork, CO.